
Image Classification with TensorFlow.js and JavaScript
I am not a machine learning expert! But I am a big fan of baking shows. Driven by hunger and jealousy at the skill of the featured bakers, my son and I regularly watch baking shows. Our favourite is the nail-biting Is It Cake?, where judges must find the ultra-realistic cake hidden among the decoy objects.
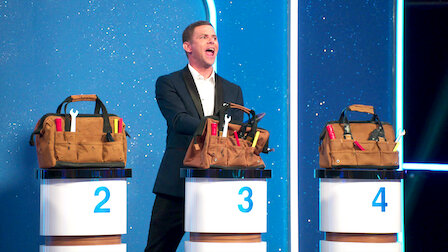
3 pedestals, 1 cake (Credit: Netflix)
Over 3 seasons I have vastly improved my cake-finding skills. But I’ve always wondered if a model could do better. Join me as I show how to extract images from web pages with JavaScript using Playwright and Unsplash to Elasticsearch, and learn how to use TensorFlow.js, a JavaScript machine learning library, to figure out if models or humans are better at finding the cake!
Data Sourcing
Irrespective of whether we use a pre-built model or train our own, we need images of both cakes and not cakes for this exercise. In this case, 2 sources of data were used that are discussed in the subsection sections.
Cake Image Gathering
For the cakes I used a list of sites I extracted from the Netflix blogs that introduced the bakers for each season, such as this one for season 1.
From these sites, I was able to pull out the src URL of each image using the JavaScript implementation Playwright, an E2E testing and automation framework maintained by Microsoft. I’ve been fortunate to use Playwright in some of my projects at work in recent years, building on my prior experience using Cypress.
The logic utilises a reusable page object to load each URL in turn. Within each page, the generic locator is used to find all <img> tags and extract the src attribute of each.
const { firefox } = require("playwright");

async function getCakeImages() {
  let browser = await firefox.launch();
  let page = await browser.newPage();

  // Utility loads the cake sites JSON file using fs
  const cakeSites = loadCakeSites();
  let imageUrls = [];

  for (site of cakeSites) {
    console.log(`Extracting image urls for site: ${site.url}`);

    try {
      await page.goto(site.url);
      const currentPageImages = await page
        .locator("img")
        .evaluateAll((images) => {
          return images
            .map((image) => {
              return image.getAttribute("src");
            })
            .filter((url) => {
              // Ensure we have extracted the src attribute
              return url != null;
            });
        });
      imageUrls = imageUrls.concat(currentPageImages);
    } catch (e) {
      console.error(`Unable to get images for site ${site.url}`);
    }
  }

  // Persist image URLs to storage for reuse in classification
  await writeUrlsToFile(imageUrls, "./scripts/cake-image-urls.json");
  await browser.close(); // Tidy up after ourselves
}
In addition to the key extraction logic, notice that we persist the URLs to cake-image-urls.json. Let’s be a good web developer and avoid repeatedly scraping the business sites of these awesome bakers, shall we?
This approach gave me 367 images of cakes to work with. Although there are some limitations to this dataset such as the inclusion of logos and biscuits, we have a good data set to start with. Sweet!
Not Cake Image Sourcing
For the opposing category, we need several different types of objects. To mirror our favourite cake show, these should be objects that we have replicated in our cake samples. I had a set of terms I had extracted based on the cakes I had found. But the question was how to get images for each of these terms easily.
For this problem, the Unsplash Developer API is a great resource to get royalty-free images matching a simple query. I used the /photos/random API endpoint to obtain a set of random photos for each query. I didn’t even need to resort to native calls as there is a JavaScript wrapper that can be installed easily in your project:
npm install unsplash-js
Once installed in my project, I used the API key I generated as part of the process of registering a new account and creating a test application to instantiate an instance of the client:
const { createApi } = require("unsplash-js");

const client_id = process.env.UNSPLASH_ACCESS_KEY;
const unsplash = createApi({
  accessKey: process.env.UNSPLASH_ACCESS_KEY
});
Once connected, the getRandom method allows for an image count and query to be passed as part of the payload to give back a set of random images that match the query:
// A sample set of queries, not the full set
const queries = [ "cup", "vase", "candle", "bottle", "plate", "tray", "thimble" ];

async function getUnsplashImageUrls() {

  let imageUrls = [];

  for (query of queries) {
    try {
      const response = await unsplash.photos.getRandom({
        count: 10,
        query: query
      });

      const responseUrls = response.response.map((result) => {
        return result.urls.small;
      });
      imageUrls = imageUrls.concat(responseUrls);

    } catch (e) {
      console.log(`Unable to get images for keyword ${query} from Unsplash`);
    }
  }

  return imageUrls;
}
Unsplash provides access to images in several sizes as part of the result.urls object. The small image size was suitable for both showing the image in my game and for the model classification stage.
One gotcha to be aware of when using a test application rather than a production application in Unsplash is there is a request limit of 50 requests per hour. Through batching, I managed to get 174 images of various non-cake objects, but I did lose a few along the way.
Pre-built Models
My prior experience with machine learning is through vector search, where I have used pre-build models to generate vectors from text to build semantic search solutions. To ease the steep learning curve for myself it made sense to start with existing models and assess their capability to find the cake.
Looking at the pre-trained models available via TensorFlow.js, I settled on 2 vision models that looked suitable for my use case.
- COCO-SSD: an object detection model. SSD, or Single Shot MultiBox Detection, is a type of model that can identify multiple objects in an image. COCO in this model name refers to the dataset Common Objects in Context on which the model was trained. It can detect 80 different classes of objects.
- MobileNet: MobileNets are small, low-latency, low-power models that can solve a variety of use cases. They are commonly used for classification and detection use cases, as well as for generating feature embeddings for different types of data. MobileNet is trained on the ImageNet image database.
Initially, I did manage to get a simple in-browser implementation working based on a simple img HTML element and the steps in this webcam tutorial from Google Developers, as evidenced from this commit. However, I had to abandon this approach and switch to generating classifications in a Node.js and Express server due to CORS error hell (sigh). What was important to my solution was having classifications at all, and them being calculated at the time in the browser was a bonus.

A person cutting a beautiful cake
Let’s see how we can classify the above image with each pre-built model using the tf-node backend.
Image Conversion
With the move to Node.js, I no longer had access to an img element on which to generate the predictions. This meant that the images needed to be preprocessed into a tensor, AKA a multi-dimensional array of a uniform type, to be consumed by the model.
For this, the approach was to create an 8-bit unsigned array from the buffer obtained when we get the image URL:
async function getTensorFromImage(imageUrl) {
    try {
      let response;

      if (imageUrl.includes("unsplash")) {
        response = await getUnsplashImageSource(imageUrl);
      } else {
        response = await getImage(imageUrl);
      }

      const buffer = response.ok
        ? new Uint8Array(await response.arrayBuffer())
        : null;

      if (!buffer) {
        return;
      }

      return tf.tidy(() => {
        const decodedImage = tf.node.decodeImage(buffer, 3);
        return decodedImage;
      });
    } catch (e) {
      throw Error(`Unable to create tensor for image ${imageUrl}`);
    }
  }
The function tf.node.decodeImage converts the buffer response to an image, with the channel count of 3 denoting an RGB image. TensorFlow.js creates intermediary tensors as part of many processes, and you may also create a few yourself. To tidy things up, wrapping logic in a tf.tidy call is a good idea for housekeeping purposes. Note that tf.tidy only supports synchronous operations, meaning for async logic tidying up using tf.dispose or tensor.dispose will help you tidy up after yourself.
COCO-SSD Predictions
To use any pre-trained model out of the box, including COCO-SSD, we need to load the model, transform the image to a tensor and generate the predictions. The example code, using the helper function getTensorFromImage discussed above, is as follows:
var tf = require('@tensorflow/tfjs-node');
var cocoSsd = require('@tensorflow-models/coco-ssd');

function getPredictionsFromCocoSsd(imageUrl) {
    const model = await cocoSsd.load();

    const tensor = await getTensorFromImage(imageUrl);
    let predictions = [];

        if (tensor && model) {
            predictions = await model.detect(tensor);
        }

    res.send(JSON.stringify(predictions));
}
Given we are running a detection algorithm, calling model.detect will give us the predictions for the image, including the position of the bounding box containing each image, similar to the below:
[
  {
    "score": 0.9078599214553833,
    "class": "cake",
    "bbox": [
      31.88125991821289, 85.59701451659203, 120.83561384677887, 236.453576952219
    ]
  },
  {
    "score": 0.8294360637664795,
    "class": "person",
    "bbox": [
      129.78285256028175, 75.89923804998398, 181.74191591143608,
      271.4830951690674
    ]
  }
]
MobileNet Classifications
The code leveraging MobileNet compared to COCO-SSD is very similar. The need to load the model and output the generated predictions is not different. As you’ll see in the below snippet, the only change is that we use model.classify to generate the image classifications rather than invoking model.detect as we did before:
var tf = require('@tensorflow/tfjs-node');
var mobilenet = require('@tensorflow-models/mobilenet');

function getClassificationsFromMobileNet(imageUrl) {
    const model = await mobilenet.load();

    const tensor = await getTensorFromImage(imageUrl);
    let predictions = [];

        if (tensor && model) {
            predictions = await model.classify(tensor);
        }

    res.send(JSON.stringify(predictions));
}
With our sample image, the results are simply a set of class names with the probability of their existence within the image:
[
  {
    "probability": 0.33521249890327454,
    "className": "shower curtain"
  },
  {
    "probability": 0.19605109095573425,
    "className": "iron, smoothing iron"
  },
  {
    "probability": 0.04750530421733856,
    "className": "tub, vat"
  }
]
Persisting Results
For both sets of results, storing the images is important to allow players of the Is it (F)ake?! game to see how they compare to the models. For this reason, I indexed the results with the image URL and category to the classifications index. Once the connection is established, we add the document using client.index.
const { Client } = require("@elastic/elasticsearch-serverless");

const index = "classifications";

const esClient = new Client({
    cloud: { id: process.env.ELASTIC_CLOUD_ID },
    auth: { apiKey: process.env.ELASTIC_API_KEY },
  });

async function addClassifiersToIndex(url, category, mobilenetClassifications, cocoSsdClassifications) {
    const imageDocument = {
        image_url: url,
        category: category,
        mobilenet_classifier: mobilenetClassifications,
        coco_ssd_predictions: cocoSsdClassifications,
        my_model_classifier: null,
      };

    return await esClient.index({
      index: index,
      document: imageDocument,
    });
}
For anyone wondering about the library import @elastic/elasticsearch-serverless, I used the preview of Elasticsearch serverless for this project. If you are aiming to persist results using an existing Elastic Cloud or local installation, please install @elastic/elasticsearch to your project instead.
Building My Own Model
The question remains as to whether I could build my own model to find the cake. TensorFlow.js provides two different types of layered models:
- Sequential models, where the output of one layer is the input of the next. These can be created using
tf.sequential(). - Functional models created using
tf.model()that allow for the creation of an arbitrary graph of layers. These models must not include cycles.
Inspired by this blog on dev.to I decided to create and train my own Convolutional Neural Network, or CNN to classify the images.

Convolutional Neural Network Diagram | Source: What is Convolutional Neural Network
As depicted in the above diagram, these models contain 3 distinct types of layers:
- Convolution layers where a filter (or kernel, basically a matrix of weights) scans the image to identify features of interest in the image, utilizing the
ReLufunction. - Pooling, or downsampling, layers that reduce the dimensionality of the preceding convolution layer to limit overfitting, reduce complexity and improve efficiency.
- A fully connected layer classifies the image using the features extracted from the convolution layers, producing a set of probabilities that the image fits the classification using the
softmaxfunction.
Combining a lot of reading and the aforementioned blog to classify cats and dogs, I ended up with the below model:
// Convolutional Neural Network (CNN) example
function createModel() {
  const model = tf.sequential();

  /* Creates a 2d convolution layer.
   * Concept from computer vision where a filter (or kernel or matrix) is applied and
   * moves through the image by the specified strides to identify features of interest
   * in the image
   * See https://www.kaggle.com/discussions/general/463431
  */
  model.add(
    tf.layers.conv2d({
      inputShape: [IMAGE_WIDTH, IMAGE_HEIGHT, 3],
      filters: 16, // dimensions of the output space
      kernelSize: 3, // 3x3 matrix
      activation: "relu", //f(x)=max(0,x)
    })
  );

  /* Max pooling reduces the dimensionality of images by reducing the number of pixels
   * in the output from the
   * previous convolutional layer.
   * Used to reduce computational load going forward and reduce overfitting
   * See https://deeplizard.com/learn/video/ZjM_XQa5s6s
  */
  model.add(
    tf.layers.maxPooling2d({
      poolSize: 2,
      strides: 2,
    })
  );

  model.add(
    tf.layers.conv2d({
      filters: 32,
      kernelSize: 3,
      activation: "relu",
    })
  );

  model.add(
    tf.layers.maxPooling2d({
      poolSize: 2,
      strides: 2,
    })
  );

  // Flattens the inputs to 1D, making the outputs 2D
  model.add(tf.layers.flatten());

  /* The Dense Layer is a simple layer of neurons in which each neuron receives input
   * from all the neurons of the previous layer,
   * thus called as dense. Dense Layer is used to classify images based on output from
   * convolutional layers.
   * See https://towardsdatascience.com/introduction-to-convolutional-neural-network-cnn-de*/
  model.add(
    tf.layers.dense({
      units: 64,
      activation: "relu",
    })
  );

  model.add(
    tf.layers.dense({
      units: CLASS_NAMES.length,
      activation: "softmax", // turns a vector of K real values into a vector of K real values that sum to 1
    })
  );

  model.compile({
    optimizer: tf.train.adam(), // Stochastic Optimization method
    loss: "binaryCrossentropy",
    metrics: ["accuracy"],
  });

  return model;
}
Once defined, I created a tensor representing the images, and another with the corresponding labels:
const CLASS_NAMES = ["cake", "not cake"];

// Get a subset of the cake images from Elasticsearch
  const cakesResponse = await getFirstNImagesByCategory(CLASS_NAMES[0], 50);
  // Resize and transform the images into tensors
  const cakeTensors = await getTensorsForImageSet(cakesResponse);

  // Get a subset of the Unsplash images for not cake images from Elasticsearch
  const notCakesResponse = await getFirstNImagesByCategory(CLASS_NAMES[1], 50);
  // Resize and transform the images into tensors
  const notCakeTensors = await getTensorsForImageSet(notCakesResponse);

  const images = cakeTensors.concat(notCakeTensors);
  const labels = Array.from({ length: cakeTensors.length })
    .fill([1, 0])
    .concat(Array.from({ length: notCakeTensors.length }).fill([0, 1]));


  // Randomize images and labels to prevent order bias while maintaining correlation
  tf.util.shuffleCombo(images, labels);
  // Create a single tensor from the tensor array
  const singleImageTensor = tf.stack(images);
  // Create a single tensor of the labels
  const labelsTensor = tf.tensor2d(labels);
The utility function getTensorsForImageSet uses similar logic used to get the image from the CDN and convert it to the tensor. The sole difference is that we resize the generated tensor using tf.image.resizeBilinear.
To train the model we use model.fit, specifying the corresponding image and tensor labels alongside the required parameters:
const BATCH_SIZE = 32;
const NUM_EPOCHS = 10;

await model.fit(singleImageTensor, labelsTensor, {
    // Number of samples to work through before updating the
    batchSize: BATCH_SIZE, internal model parameters
    // Number of passes through the dataset
    epochs: NUM_EPOCHS,
    // Shuffle data before each pass
    shuffle: true,
});
With the additional parameters, we can tweak the number of images processed before the internal model parameters are updated (batchSize), the number of training iterations using our dataset (or epochs) and request that the data is shuffled again before each pass through via the shuffle option.
Transfer Learning
If you have gotten to this point in this extensive piece, you will realise how involved it can be to create your own CNN model for image classification. If we want to leverage an existing model, and all of the knowledge it has, we can use a technique called Transfer Learning. As illustrated in the below diagram, Transfer Learning is where we create a new classification head for our precise task that uses the features generated from another model:
Transfer Learning Example | Source: What is Transfer Learning?
MobileNet can be retrained for your own use case via transfer learning if the out-of-the-box classifications don’t suit your needs. However, unlike the model we have loaded directly from @tensorflow-models/mobilenet, you need the feature-vector version that generates the features via the model’s convolution and pooling stages.
This model can be loaded from TFHub using the tf.loadGraphModel utility as shown in the below:
const tf = require("@tensorflow/tfjs-node");

async function getMobileNetFeatureModel() {
  const URL =
    "https://tfhub.dev/google/tfjs-model/imagenet/mobilenet_v3_small_100_224/feature_vector/5/default/1";

  const mobileNetModel = await tf.loadGraphModel(URL, { fromTFHub: true });

  // Warm up the model
  tf.tidy(() => {
    // 3 for RGB images
    mobileNetModel.predict(tf.zeros([1, IMAGE_HEIGHT, IMAGE_WIDTH, 3]));
  });

  return mobileNetModel;
}
One additional step I have done here is to warm up the model by passing zeros through the model first. This is an optional step, but it does speed up the processing of the initial image. So I would probably use this technique in future with the other approaches covered in this piece.
Next, we need to create the image classification head to use alongside the MobileNet model:
function getTransferClassificationModel() {
  // Alternative model classification head
  const myTransferMobileNetModel = tf.sequential();
  myTransferMobileNetModel.add(
    tf.layers.dense({ inputShape: [1024], units: 128, activation: "relu" })
  );
  myTransferMobileNetModel.add(
    tf.layers.dense({ units: CLASS_NAMES.length, activation: "softmax" })
  );

  myTransferMobileNetModel.summary();

  // Compile the model with the defined optimizer and specify a loss function to use.
  myTransferMobileNetModel.compile({
    // Adam changes the learning rate over time which is useful.
    optimizer: "adam",
    // Use the correct loss function. If 2 classes of data, must use binaryCrossentropy.
    // Else categoricalCrossentropy is used if more than 2 classes.
    loss:
      CLASS_NAMES.length === 2
        ? "binaryCrossentropy"
        : "categoricalCrossentropy",
    metrics: ["accuracy"],
  });

  return myTransferMobileNetModel;
}
Notice we are creating similar dense layers for the classification layer that we did in our custom model. We’re also using the same optimizer and loss functions.
Next, we need to train this model. Using the same logic as prior examples to get a set of image tensors and labels, we extract the features and fit the model using the below code:
  // Tensor and label generation logic omitted

  // Initialize both models (as per above)
  const mobileNetModel = await getMobileNetFeatureModel();
  const myTransferMobileNetModel = getTransferClassificationModel();

  // Get features from MobileNet
  const mobileNetFeatures = images.map((image) => {
    // Normalize the image data. Image data is always in the range of 0 to 255,
    // so you can simply divide resizedTensorFrame by 255 to ensure all values are
    // between 0 and 1 instead as MobileNet expects
    const normalizedImageTensor = image.div(255);
    return mobileNetModel.predict(normalizedImageTensor.expandDims()).squeeze();
  });

  // Train the new model using MobileNet features similar to other examples
  tf.util.shuffleCombo(mobileNetFeatures, labels);
  const singleImageTensor = tf.stack(mobileNetFeatures);
  const labelsTensor = tf.tensor2d(labels);

  await myTransferMobileNetModel.fit(singleImageTensor, labelsTensor, {
    // Number of samples to work through before updating the internal model parameters
    batchSize: 5,
    // Number of passes through the dataset
    epochs: 10,
    // Shuffle data before each pass
    shuffle: true
  });
Once the model has been fitted, the same approach is used to generate the features to pass into model.predict:
async function classifyAllImages(mobileNetModel, model) {
  const imagesResponse = await getAllImages();
  const images = imagesResponse.hits.hits.flatMap((result) => {
    return { id: result._id, url: result._source.image_url };
  });

  for (image of images) {
    const tensor = await getResizedImageTensor(image.url);
    const normalizedImageTensor = tensor.div(255);

    const features = mobileNetModel.predict(normalizedImageTensor.expandDims()).squeeze();
    const results = await model.predict(features.expandDims()).squeeze().data();

    const predictions = Array.from(results)
      .map(function (p, i) {
        return {
          probability: p,
          className: CLASS_NAMES[i],
        };
      })
      .sort(function (a, b) {
        return b.probability - a.probability;
      })
      .slice(0, 2);

    // Elasticsearch utility to update the document with the additional transfer classifications
    updateDocumentWithTransferClassification(
      image.id,
      predictions[0].className,
      predictions
    );
  }
}
For both the custom model and the transfer classifications, the Elasticsearch documents in the existing documents are updated using the update operation as they were previously created. The logic for the transfer classification approach is presented below:
async function updateDocumentWithTransferClassification(documentId, category, predictions) {
  const myModelClassifier = {
    category:  category,
    predictions: predictions
  };
  try {
    await esClient.update(
      {
        index: index,
        id: documentId,
        script: {
          lang: 'painless',
          source: `ctx._source.my_transfer_model_classifier = params.classification`,
          params: { classification: myModelClassifier }
        }
      }
    );
  } catch(e) {
    console.log(e);
  }
}
Note that to update the custom model classifications, the script.source attribute should be changed to ctx._source.my_model_classifier.
Key Results
Analysing the results of both the model classifications and the players of the web game was very easy. By enriching the user-classifications index with an index pipeline I was able to have all classifications in a single object to compare:
PUT _ingest/pipeline/add-classifications-to-gameplay
{
  "processors": [
      {
        "enrich": {
          "description": "Add model classifications based on image URL for final results",
          "policy_name": "add-classifications",
          "field": "image_url",
          "target_field": "models",
          "max_matches": "1"
        }
      }
    ]
}
The add classifications enrichment policy adds the prediction results from each model to the gameplay result:
PUT /_enrich/policy/add-classifications
{
  "match": {
    "indices": "classifications",
    "match_field": "image_url",
    "enrich_fields": [ "coco_ssd_predictions", "mobilenet_classifier", "my_model_classifier", "my_transfer_model_classifier"]
  }
}

//  Create a streamlined system index called the enrich index, which is used to enrich incoming documents
PUT /_enrich/policy/add-classifications/_execute
By enriching the results for the image against the gameplay object, it’s easy to pull back the final comparisons at the end of the game for the game scoreboard with a simple match query, as present in elasticsearch-util.js to produce the following leaderboard:
Then to track multiple games, we can use a handy Kibana dashboard, just as I have below:

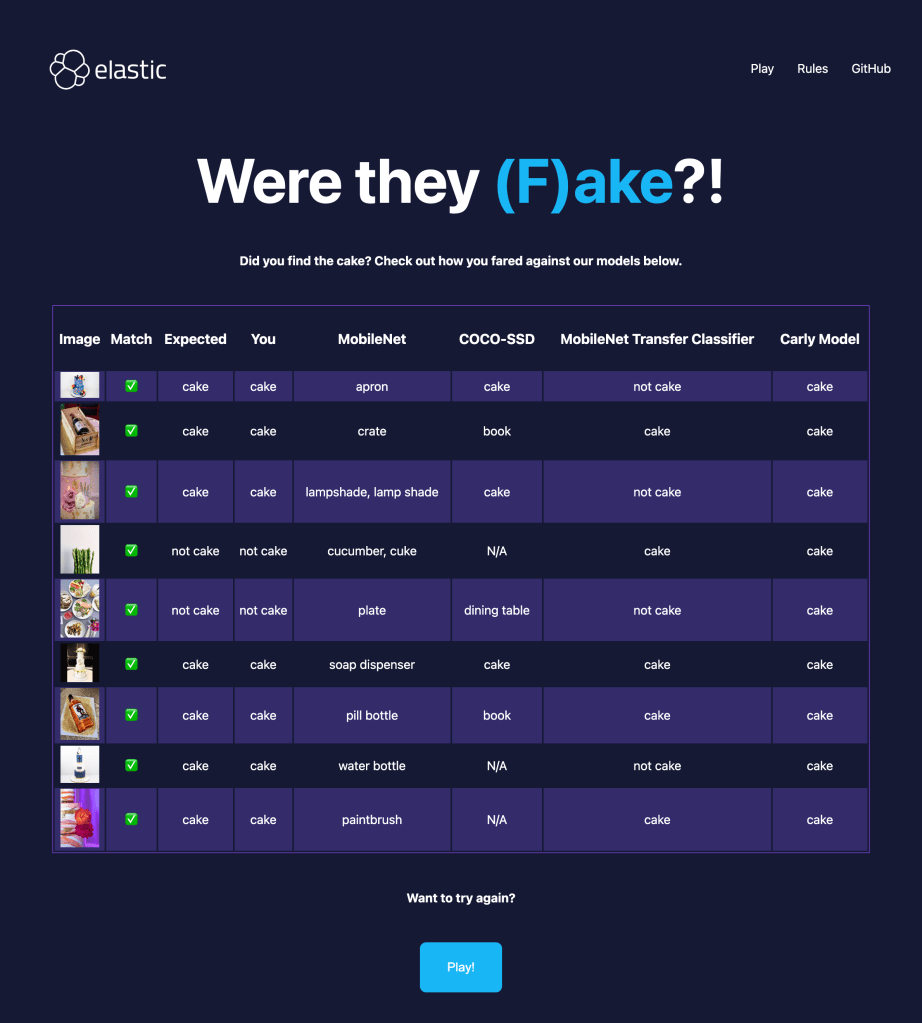
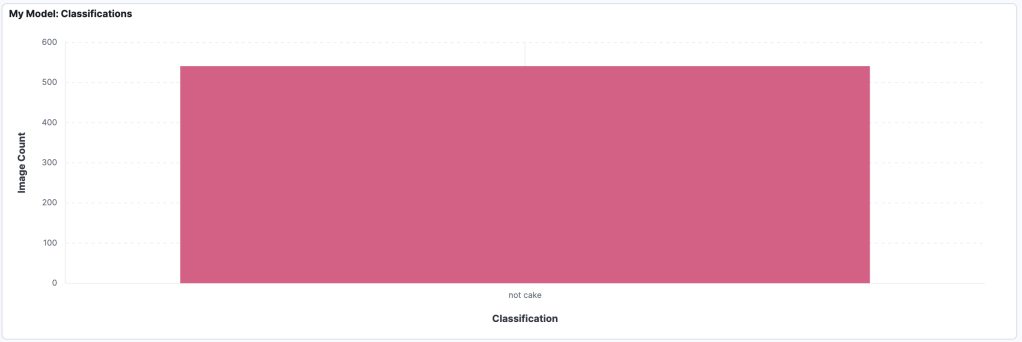
Looking at the performance of myself and my family across 3 games each, we are very good at finding the cake, finding that we correctly classified 90 distinct images 86% of the time. This is far better than my own model which thought all images were cake:
Using transfer learning improved the situation and found that 319 of the images were cake:
Meanwhile, of the pre-trained models, COCO-SSD outperformed MobileNet by identifying a higher proportion of cake.

While I understand MobileNet’s assertion that many cakes look like candles, you don’t want to mix up delicious cakes with non-edible candles!
Conclusion
In this piece I’ve walked through my journey of learning image classification in JavaScript using TensorFlow.js using images extracted using Playwright and the Unsplash API via the unsplash-js wrapper into Elasticsearch. This experience has given me an appreciation of the complexity of building machine learning models that makes me thankful for those building the models I use in my pet projects, including for vector search. I still have a lot to learn since I’ve found my manual classifications of cake are more accurate than existing models as well as my custom model and transfer classification.
Do check out all of the code for each approach in this GitHub repo. If you want to pit your own cake-finding skills against these models, play the game at https://is-it-fake.netlify.app/
Thanks for reading!
